Kubernetes High Availability Essential Practices Simply Explained
The surge of containers has completely revolutionized the way we build and deploy software. Docker came along as a gift to software developers and helped enterprises gain control over their software. In addition, the introduction of microservices was also a big boost as containers allowed developers to package various microservices.
As container adoption increases in an organization, the number of containers is surging. As a result, there comes a time for a container orchestration tool to automate the deployment, maintenance, and scaling of these containers. That’s where Kubernetes comes in.
Introduction to Kubernetes
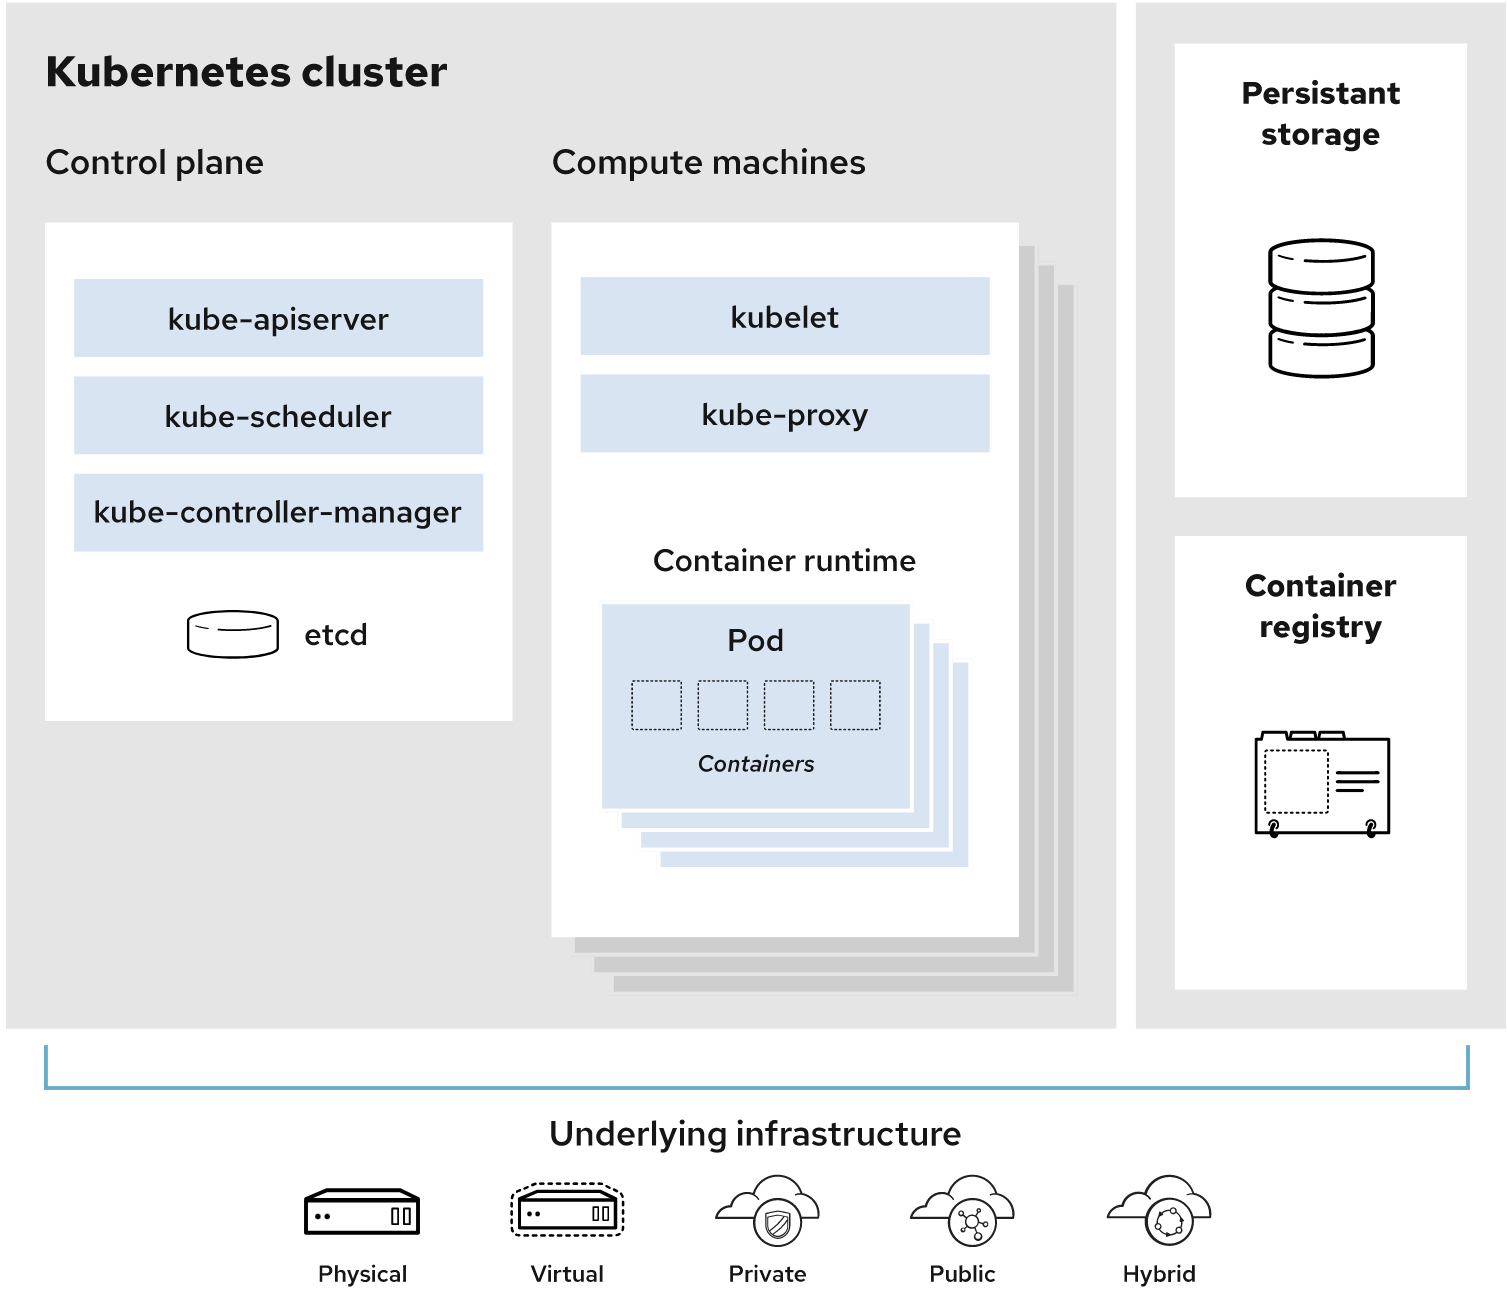
Kubernetes is an open-source system for automated deployment, scaling, and management of containerized applications. It was first created by Google and then released as an open-source project. In this article, we will explore the importance of Kubernetes and its high availability for enterprises. Kubernetes provides developers with a framework to build distributed systems, manage workloads and provide declarative configuration. As described in this Red Hat blog article, the structure of a Kubernetes cluster can be illustrated as follows:

Kubernetes is made up of a set of core components that can be used separately or together to orchestrate containers across multiple hosts, providing control groups and namespaces to manage the resources of those containers. Kubernetes has the following advantages:
- It brings scalability and reliability, which in turn helps the system stay stable.
- Self-healing, ensuring containers are running in a healthy state.
- It handles node failures gracefully.
- Auto-scaling, making it easy for developers to create clusters without the need for human intervention.
Basics of high availability
In a nutshell, high availability is a system or network that tries to minimize the downtime, or the time when a service is unavailable to a user who has a minimal chance of being affected. This can be achieved in many ways, from replication to failover.
In the context of Kubernetes, high availability is a set of configurations that aim to provide a minimal level of service. For example, the application will still have a minimal level of service while a node goes down.
Essentials for high availability
There are three essentials for implementing high availability:
- Determine the desired level of availability in your application. The acceptable level of downtime varies depending on the application and the business objectives.
- Deploy your application with a redundant control plane. The control plane manages the cluster state and helps to ensure that your applications are available to users.
- Deploy your application with a redundant data plane. This means replicating the data across every node in the cluster.
Kubernetes high availability comes in two forms: active-active and active-passive clusters.
Active-active clusters provide high availability by running multiple copies of services across all nodes in the cluster. Active-passive clusters make use of backup nodes that are idle most of the time, with only one copy of the service running at any given time, but if needed, they can be quickly scaled up to handle the load.
The way to create a highly available cluster is to use the Kubernetes control plane, which is responsible for scheduling containers for resources. Kubernetes prevents single points of failure by using replication controllers so that failures of any hardware or software component will not affect the entire cluster.
Kubernetes high availability strategies

The control plane components are highly critical for the operation of Kubernetes clusters, which means that if the control plane node goes down, some issues will occur. Hence, adding redundancy to the control plane is highly considered. This is true for both geographically distributed clusters and single data center deployments.
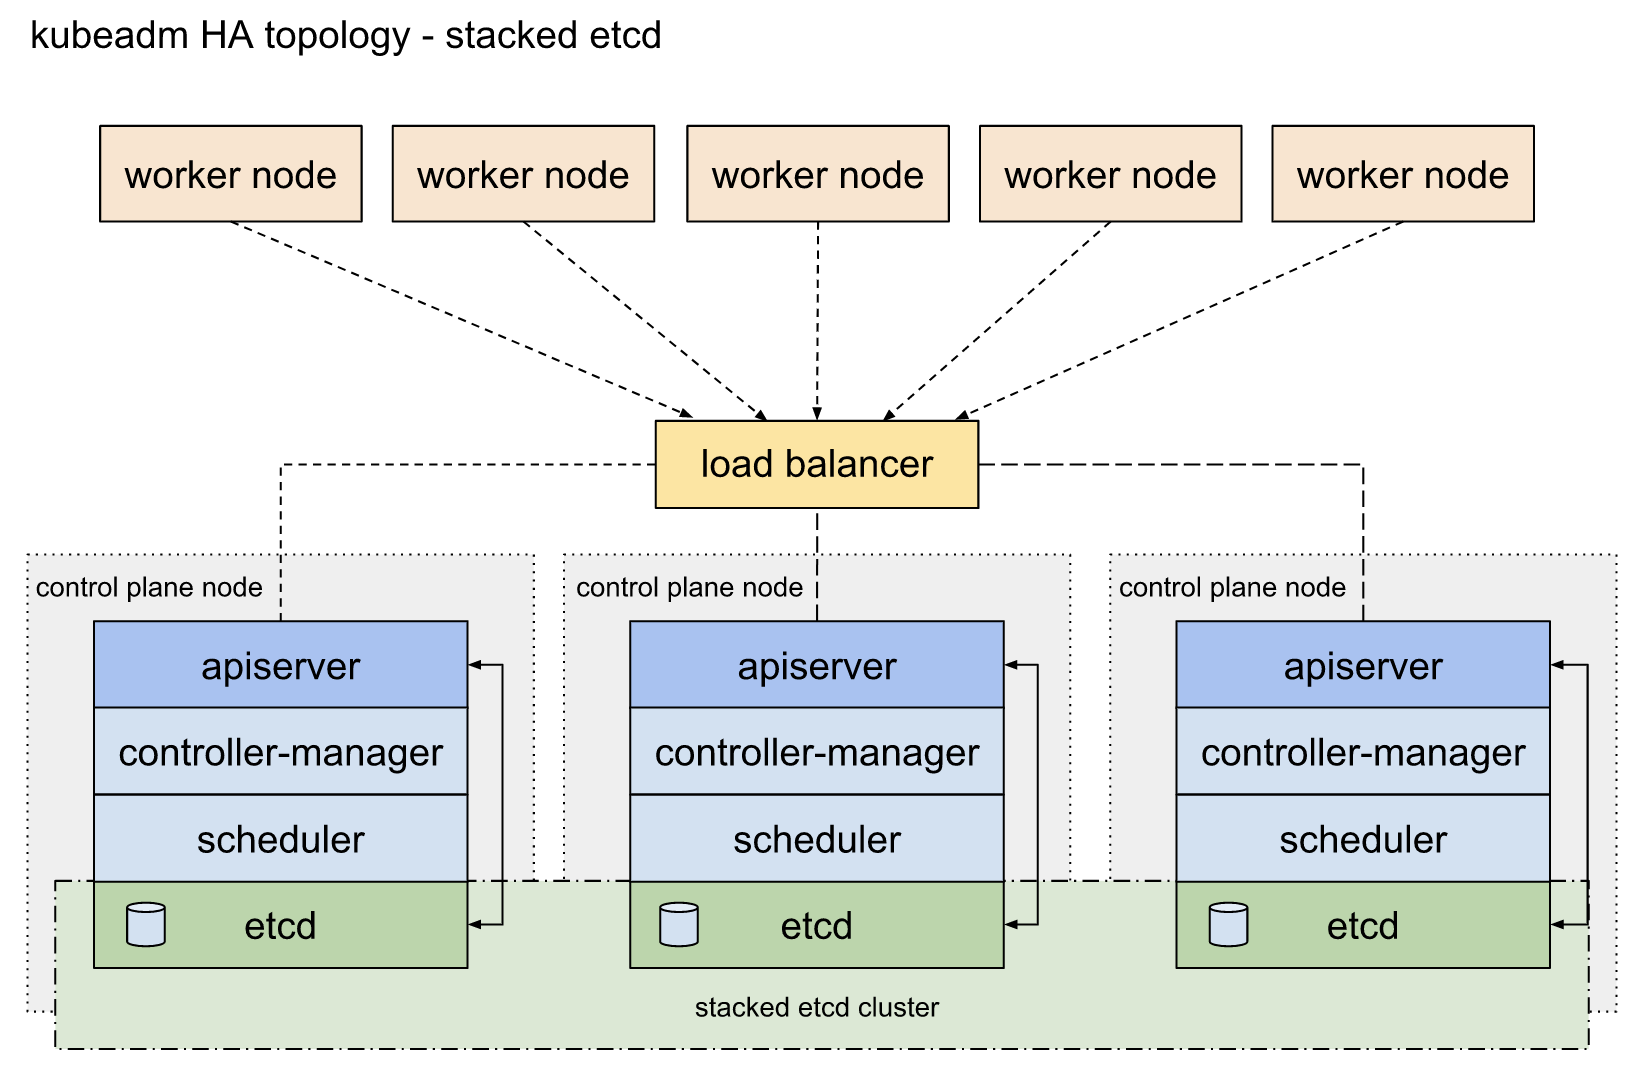
Kubernetes promotes two ways for HA topologies. One is with having stacked control plane nodes and this is a default choice in kubeadm. kubeadm is a recommended tool to set up a cluster with a thoughtful set of default configurations. It is advised to have a redundancy of minimum three-node for enterprises that employ stacked clusters.

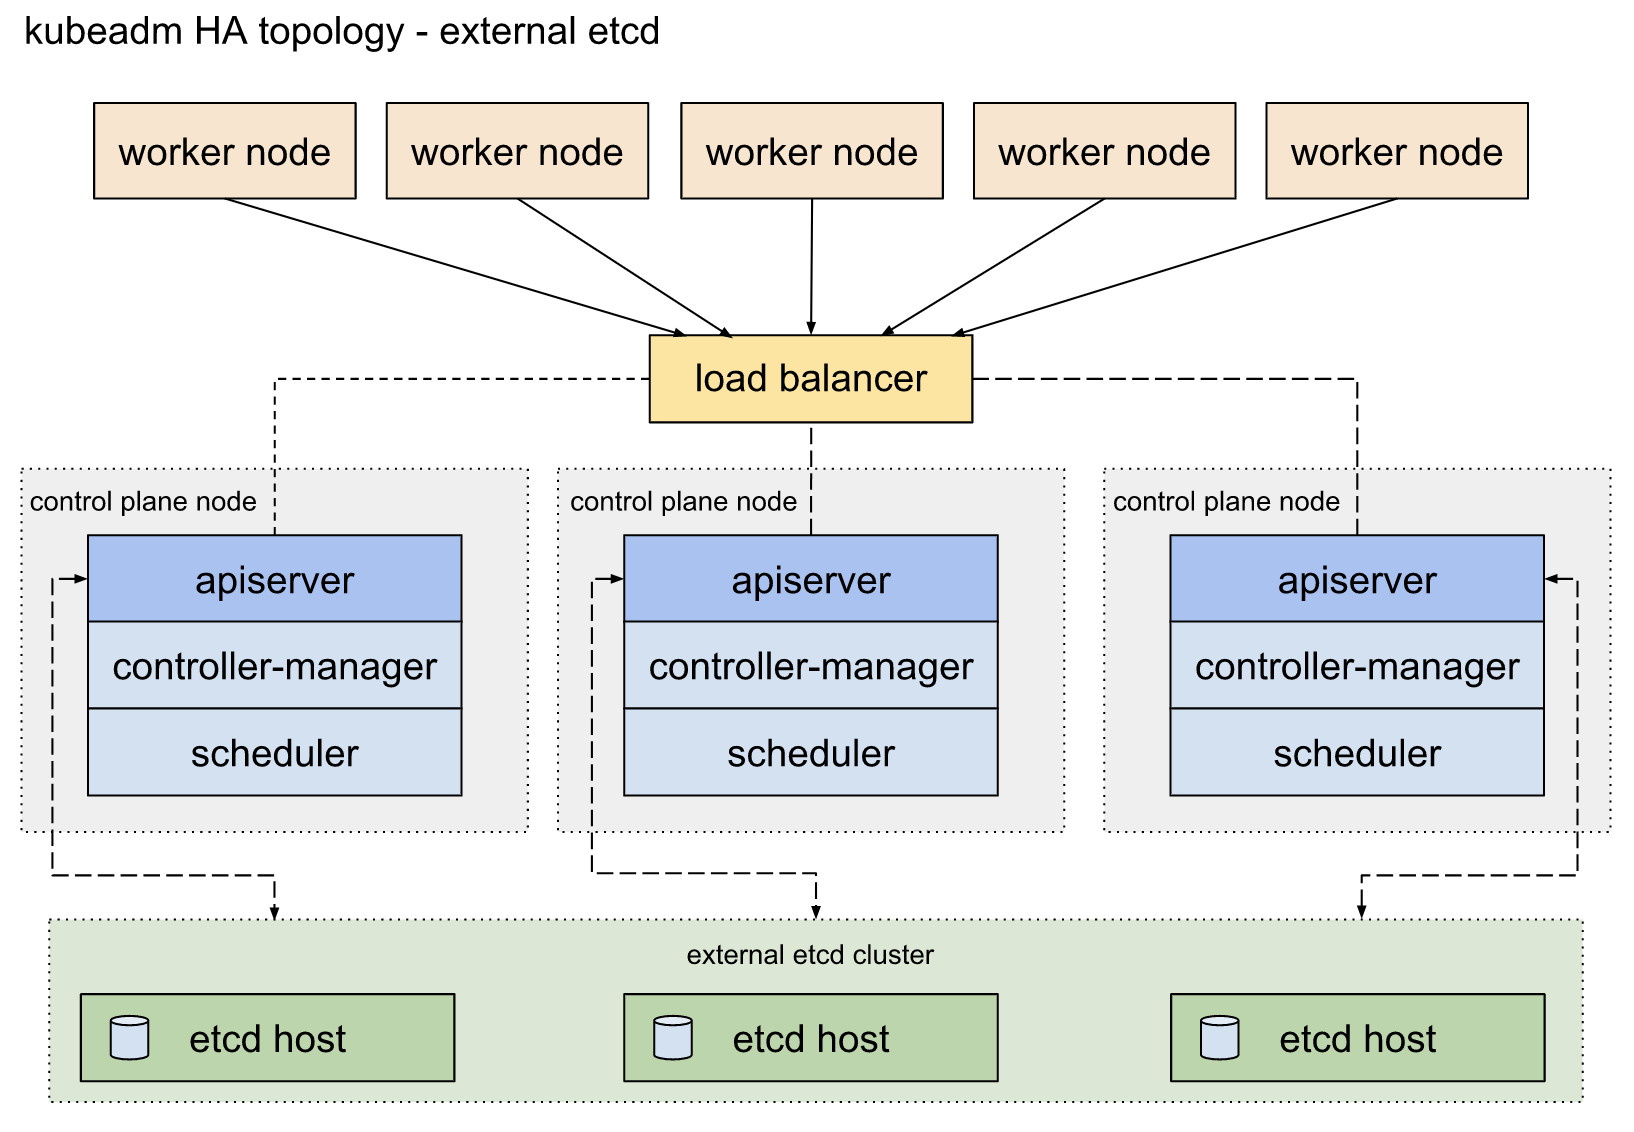
The second path for Kubernetes HA topology includes external etcd nodes. Separate nodes are required to run the redundant control plane and etcd nodes. It also incorporates another load balancer for high efficiency between the control plane and etcd nodes.
Set Up a Highly Available Kubernetes Cluster Using KubeKey
KubeKey is an efficient installer built on kubeadm. It provides a convenient approach to the installation and configuration of your Kubernetes or K3s cluster. You can use it to create, scale, and upgrade your Kubernetes cluster with ease. It also allows you to install cloud-native add-ons as you set up your cluster.
Architecture
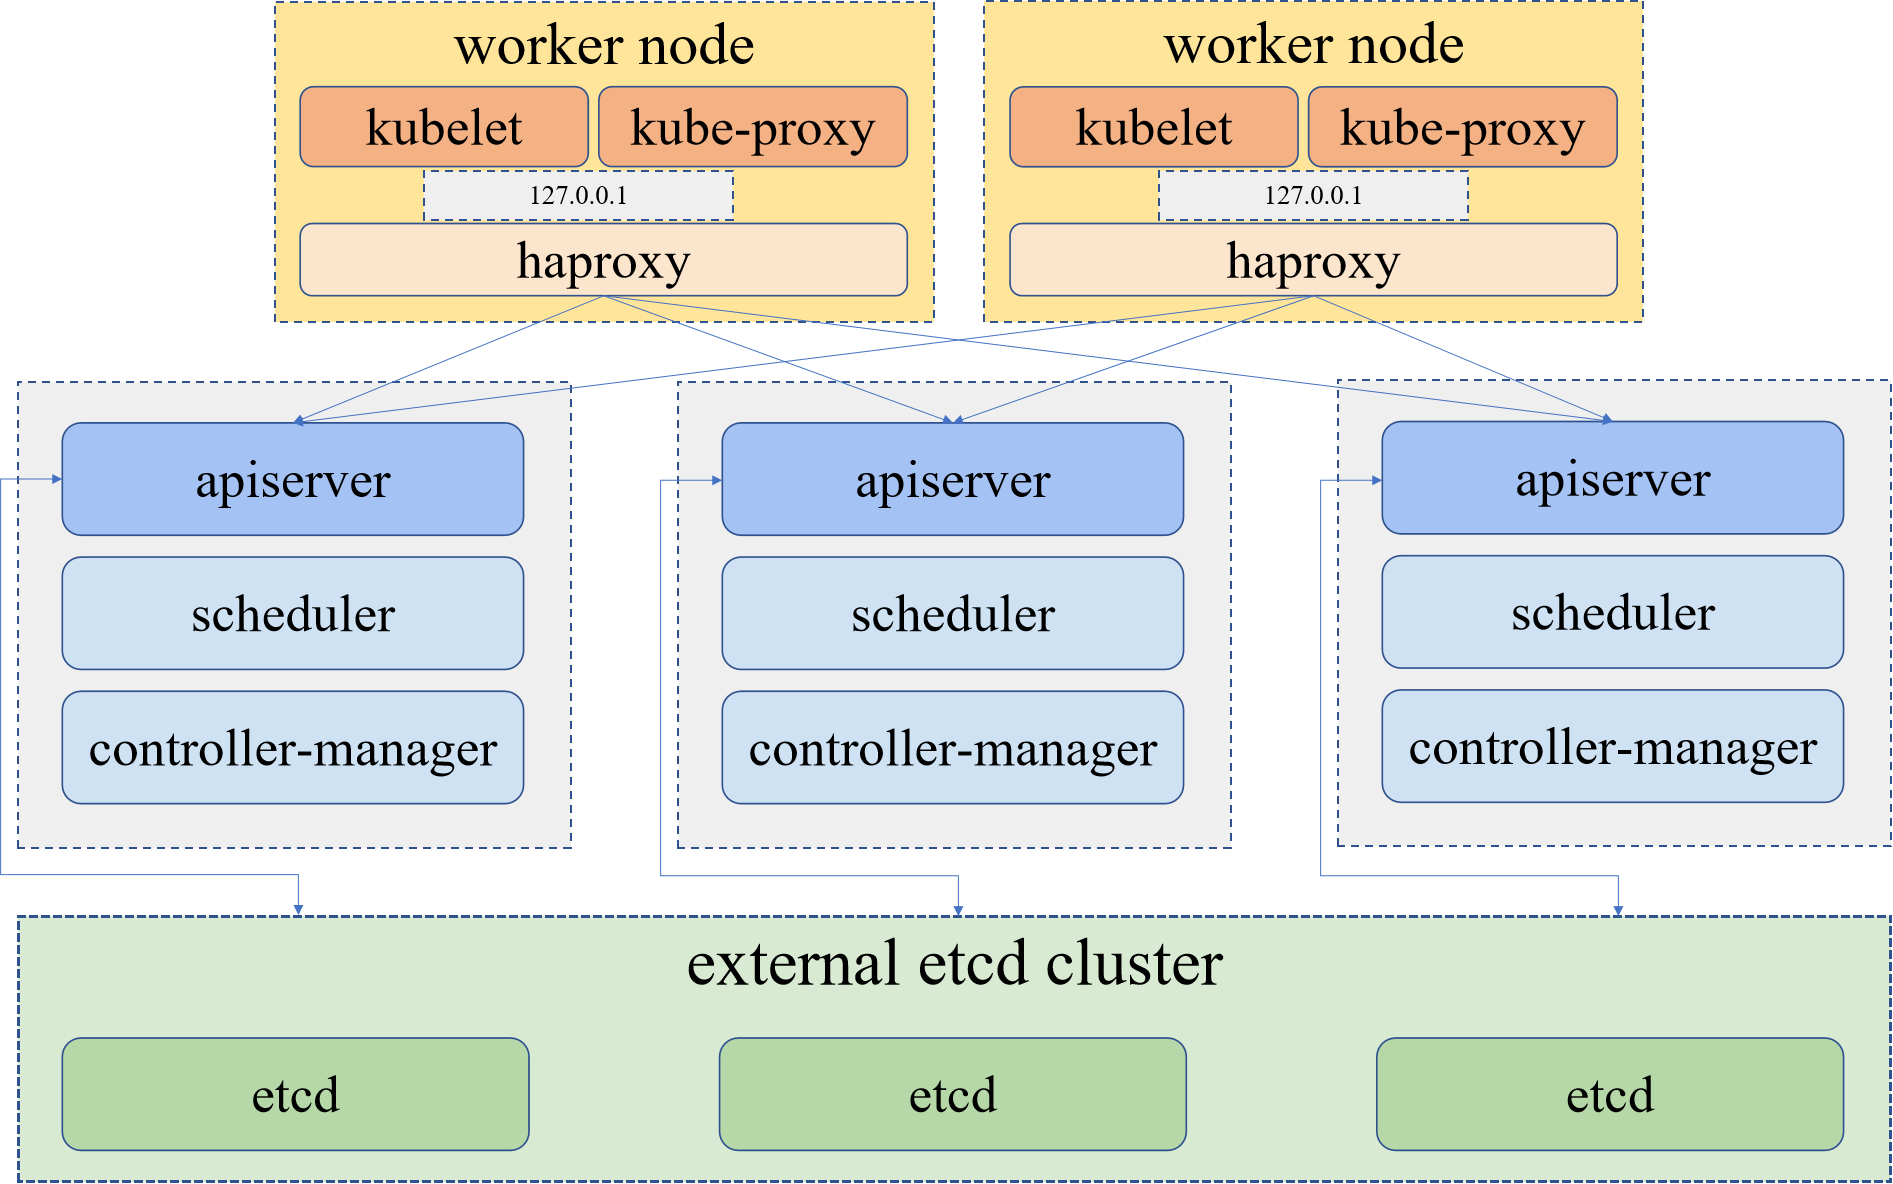
KubeKey has supported the quick deployment of HA clusters since v1.2.0. Specifically, KubeKey deploys a built-in HAProxy on each worker node. Kubernetes components on all control plane nodes connect to the kube-apiserver, while those on the worker nodes connect to the kube-apiserver of the control plane nodes by using HAproxy as a reverse proxy.

Download KubeKey
Follow the steps below to download KubeKey.
-
Download KubeKey from its GitHub Release Page or use the following command directly.
curl -sfL https://get-kk.kubesphere.io | VERSION=v2.0.0 sh - -
Make
kkexecutable.chmod +x kk -
Create an example configuration file with default configurations. You can set the Kubernetes version from 1.17 to 1.22 as needed. Here Kubernetes 1.21.5 is used as an example.
./kk create cluster --with-kubernetes v1.21.5
Cluster Configuration
After you run the commands above, a configuration file config-sample.yaml will be created as follows. Edit the file to add server information, configure the load balancer and more.
spec:
  hosts:
  - {name: master1, address: 192.168.0.2, internalAddress: 192.168.0.2, user: ubuntu, password: Testing123}
  - {name: master2, address: 192.168.0.3, internalAddress: 192.168.0.3, user: ubuntu, password: Testing123}
  - {name: master3, address: 192.168.0.4, internalAddress: 192.168.0.4, user: ubuntu, password: Testing123}
  - {name: node1, address: 192.168.0.5, internalAddress: 192.168.0.5, user: ubuntu, password: Testing123}
  - {name: node2, address: 192.168.0.6, internalAddress: 192.168.0.6, user: ubuntu, password: Testing123}
  - {name: node3, address: 192.168.0.7, internalAddress: 192.168.0.7, user: ubuntu, password: Testing123}
  roleGroups:
    etcd:
    - master1
    - master2
    - master3
    master:
    - master1
    - master2
    - master3
    worker:
    - node1
    - node2
    - node3
Enable the HA mode
The following shows how to enable the HA mode.
spec:
  controlPlaneEndpoint:
    ##Internal loadbalancer for apiservers
    internalLoadbalancer: haproxy

    domain: lb.kubesphere.local
    address: ""
    port: 6443
- When enabling the HA mode, uncomment
internalLoadbalancer. - The address and port should be indented by two spaces in
config-sample.yaml. - The domain name of the load balancer is
lb.kubesphere.localby default for internal access.
Start installation
After you complete the configuration, you can execute the following command to start the installation:
./kk create cluster -f config-sample.yaml
Wait for a while. If the configuration is correct, you will see a log of successful installation.
Conclusion
Kubernetes is leading the way when it comes to container orchestration. It is not only about adopting Kubernetes but deploying your applications in a highly available fashion under Kubernetes HA strategies. Implementing high availability is a great step towards improving performance and stability for your Kubernetes cluster. This article hopes to shed a light on the concepts and practical tools when provisioning a highly available Kubernetes cluster.


