


使用 KubeKey 内置 HAproxy 创建高可用集群
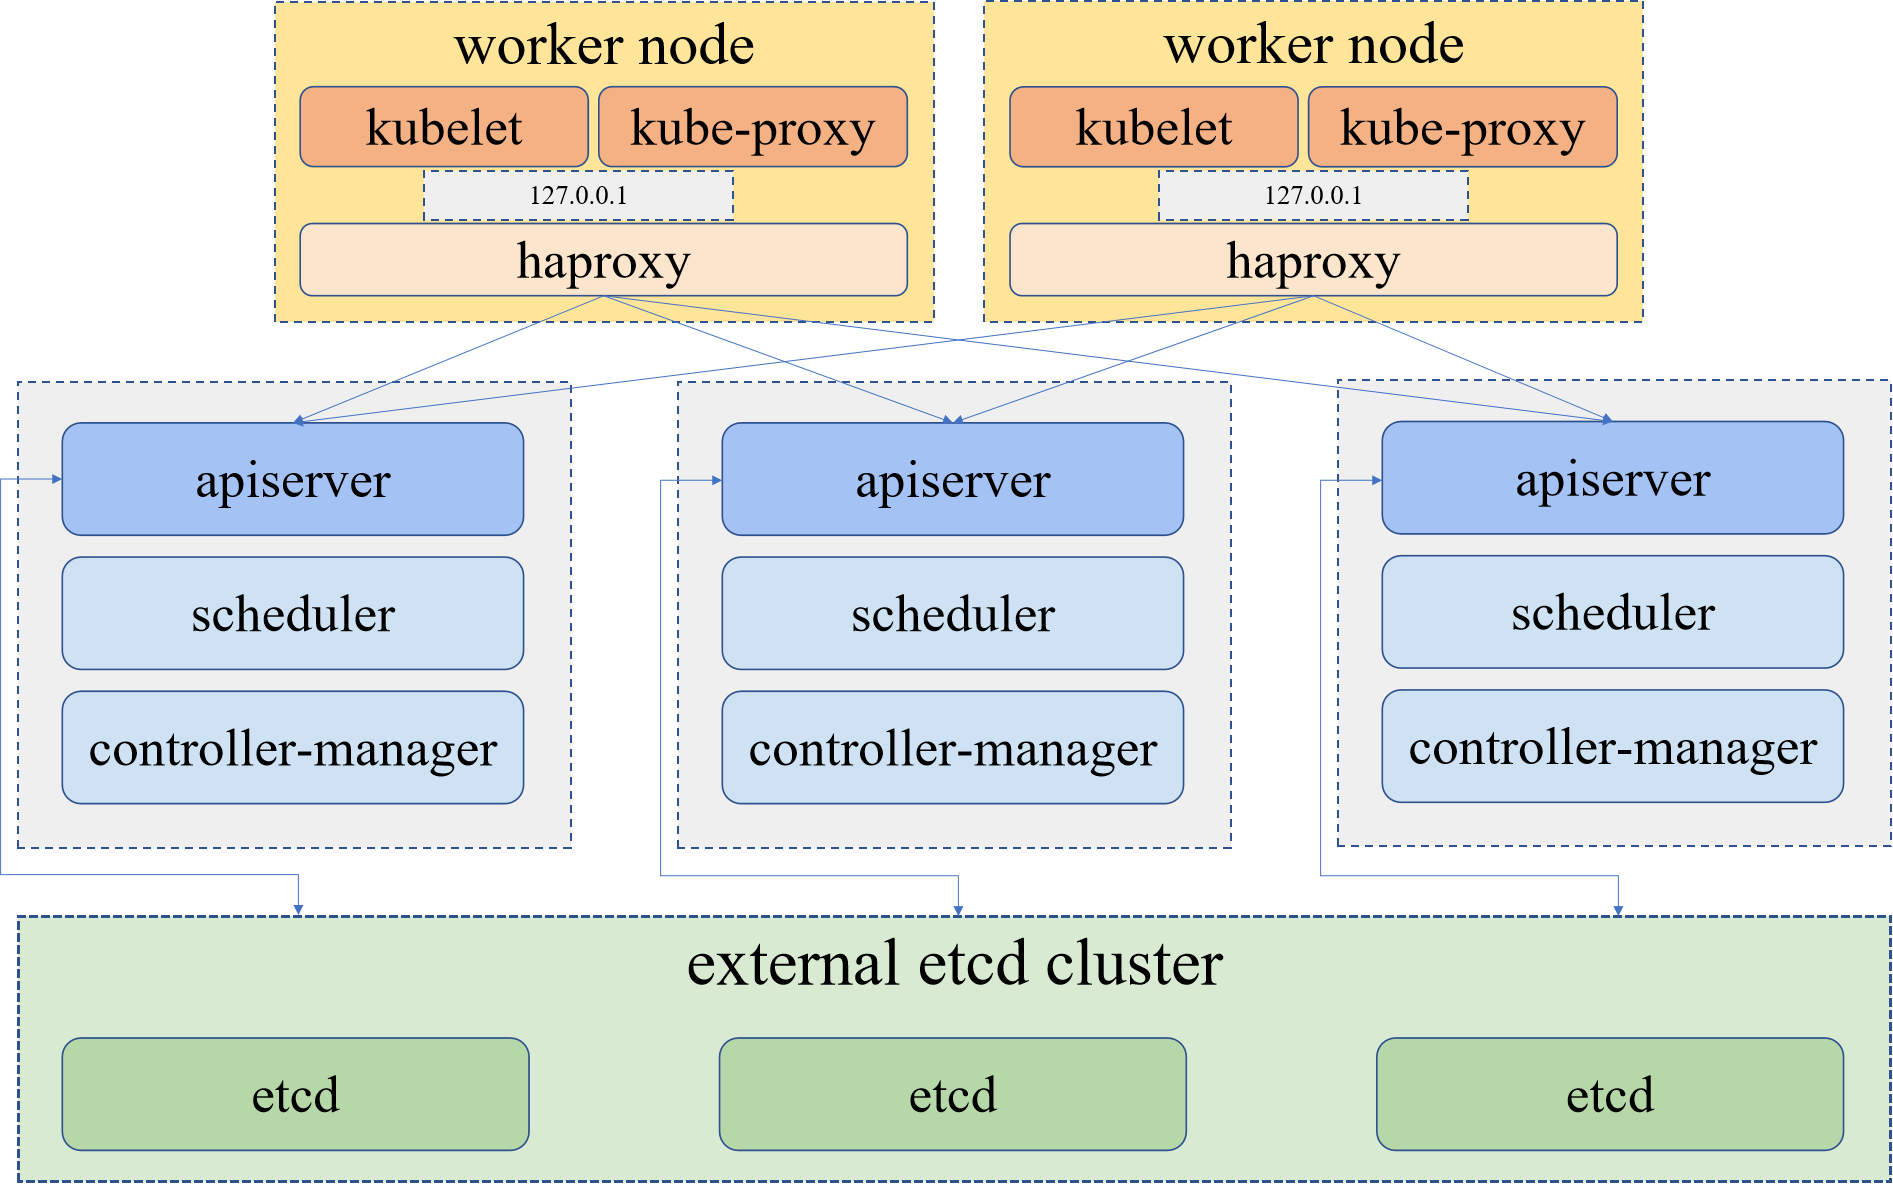
KubeKey 作为一种集群安装工具,从版本 v1.2.1 开始,提供了内置高可用模式,支持一键部署高可用集群环境。KubeKey 的高可用模式实现方式称作本地负载均衡模式。具体表现为 KubeKey 会在每一个工作节点上部署一个负载均衡器(HAproxy),所有主节点的 Kubernetes 组件连接其本地的 kube-apiserver ,而所有工作节点的 Kubernetes 组件通过由 KubeKey 部署的负载均衡器反向代理到多个主节点的 kube-apiserver 。这种模式相较于专用到负载均衡器来说效率有所降低,因为会引入额外的健康检查机制,但是如果当前环境无法提供外部负载均衡器或者虚拟 IP(VIP)时这将是一种更实用、更有效、更方便的高可用部署模式。
本教程演示了在 Linux 上安装 KubeSphere 时,使用 KubeKey 内置高可用模式部署的大体配置。
架构
下图举例展示了内置高可用模式的架构图。有关系统和网络要求的更多信息,请参见多节点安装。
备注
在生产环境中,请确保准备了 6 台 Linux 机器,其中 3 台充当主节点,另外 3 台充当工作节点。
下载 KubeKey
请按照以下步骤下载 KubeKey。
从 GitHub Release Page 下载 KubeKey 或直接使用以下命令。
curl -sfL https://get-kk.kubesphere.io | VERSION=v2.0.0 sh -
先执行以下命令以确保您从正确的区域下载 KubeKey。
export KKZONE=cn
执行以下命令下载 KubeKey:
curl -sfL https://get-kk.kubesphere.io | VERSION=v2.0.0 sh -
备注
在您下载 KubeKey 后,如果您将其传至新的机器,且访问 Googleapis 同样受限,在您执行以下步骤之前请务必再次执行
export KKZONE=cn 命令。备注
执行以上命令会下载最新版 KubeKey (v2.0.0),您可以修改命令中的版本号下载指定版本。
为 kk 添加可执行权限:
chmod +x kk
创建包含默认配置的示例配置文件。这里使用 Kubernetes v1.21.5 作为示例。
./kk create config --with-kubesphere v3.2.1 --with-kubernetes v1.21.5
备注
-
安装 KubeSphere 3.2.1 的建议 Kubernetes 版本:v1.19.x、v1.20.x、v1.21.x 或 v1.22.x(实验性支持)。如果不指定 Kubernetes 版本,KubeKey 将默认安装 Kubernetes v1.21.5。有关受支持的 Kubernetes 版本的更多信息,请参见支持矩阵。
-
如果您在这一步的命令中不添加标志
--with-kubesphere,则不会部署 KubeSphere,只能使用配置文件中的addons字段安装,或者在您后续使用./kk create cluster命令时再次添加这个标志。 -
如果您添加标志
--with-kubesphere时不指定 KubeSphere 版本,则会安装最新版本的 KubeSphere。
部署 KubeSphere 和 Kubernetes
运行以上命令后,会创建一个配置文件 config-sample.yaml。编辑该文件以添加机器信息、配置负载均衡器和其他内容。
备注
如果您自定义文件名,文件名称可能会不同。
config-sample.yaml 示例
spec:
  hosts:
  - {name: master1, address: 192.168.0.2, internalAddress: 192.168.0.2, user: ubuntu, password: Testing123}
  - {name: master2, address: 192.168.0.3, internalAddress: 192.168.0.3, user: ubuntu, password: Testing123}
  - {name: master3, address: 192.168.0.4, internalAddress: 192.168.0.4, user: ubuntu, password: Testing123}
  - {name: node1, address: 192.168.0.5, internalAddress: 192.168.0.5, user: ubuntu, password: Testing123}
  - {name: node2, address: 192.168.0.6, internalAddress: 192.168.0.6, user: ubuntu, password: Testing123}
  - {name: node3, address: 192.168.0.7, internalAddress: 192.168.0.7, user: ubuntu, password: Testing123}
  roleGroups:
    etcd:
    - master1
    - master2
    - master3
    control-plane:
    - master1
    - master2
    - master3
    worker:
    - node1
    - node2
    - node3
有关该配置文件中不同字段的更多信息,请参见 Kubernetes 集群配置和多节点安装。
开启内置高可用模式
spec:
  controlPlaneEndpoint:
    ##Internal loadbalancer for apiservers
    internalLoadbalancer: haproxy

    domain: lb.kubesphere.local
    address: ""
    port: 6443
备注
- 开启内置高可用模式,需要将
internalLoadbalancer字段取消注释。 config-sample.yaml文件中的address和port应缩进两个空格。- 负载均衡器默认的内部访问域名是
lb.kubesphere.local。
持久化存储插件配置
在生产环境中,您需要准备持久化存储并在 config-sample.yaml 中配置存储插件(例如 CSI),以明确您想使用哪一种存储服务。有关更多信息,请参见持久化存储配置。
启用可插拔组件(可选)
自 v2.1.0 起,KubeSphere 解耦了一些核心功能组件。您可以在安装之前或者之后启用这些可插拔组件。如果您不启用这些组件,KubeSphere 将默认以最小化安装。
您可以根据您的需求来启用任意可插拔组件。强烈建议您安装这些可插拔组件,以便体验 KubeSphere 提供的全栈特性和功能。启用前,请确保您的机器有足够的 CPU 和内存。有关详情请参见启用可插拔组件。
开始安装
配置完成后,您可以执行以下命令来开始安装:
./kk create cluster -f config-sample.yaml
验证安装
-
运行以下命令查看安装日志。
kubectl logs -n kubesphere-system $(kubectl get pod -n kubesphere-system -l app=ks-install -o jsonpath='{.items[0].metadata.name}') -f -
若您看到以下信息,您的高可用集群便已创建成功。
#####################################################
###              Welcome to KubeSphere!           ###
#####################################################

Console: http://192.168.0.3:30880
Account: admin
Password: P@88w0rd

NOTES:
  1. After you log into the console, please check the
     monitoring status of service components in
     the "Cluster Management". If any service is not
     ready, please wait patiently until all components
     are up and running.
  2. Please change the default password after login.

#####################################################
https://kubesphere.io             2020-xx-xx xx:xx:xx
#####################################################
反馈
这篇文章对您有帮助吗?
通过邮件接收 KubeSphere 最新的技术博客与产品更新的通知
 上一篇
上一篇

页面内容